Vertex displacement with a noise function using GLSL and three.js
This is a tutorial showing the steps to create an animated shape, using a sphere as a basic geometry and perlin noise to disturb the vertices. It also teaches how to add some more variation to the distortion and how to add colour. It's based on Fireball explosion, part of the Experiments with Perlin Noise Series.
I'm using three.js to create the geometry and setting up the scene, but the GLSL code can be used with any other WebGL/OpenGL library. I'm quite sure it's also pretty straightforward to translate into HLSL.
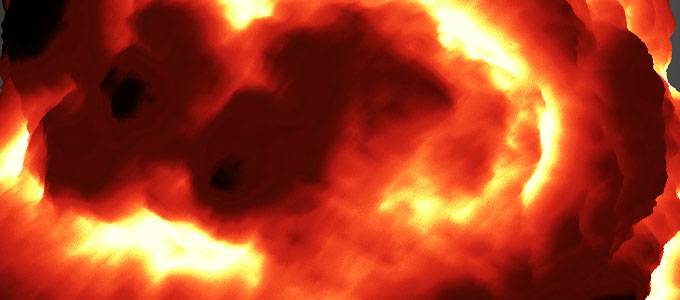
I'm going to assume for this tutorial that you already have some knowledge of WebGL or a favorite library for 3D. In this case, I'll be using three.js. I'll write the necessary code to set up the scene with three.js, but won't be explaining what it does. There's a lot of examples and documentation for that. You may need to check those links first, and I'll try to keep it all very basic.
Creating the scene: a sphere and a camera
We need several things to start, but it all boils down to: including three.js, creating a renderer, a scene, a camera, a material, and a mesh. Our scene will contain the mesh and the camera. The camera will be looking right at the mesh. If you want to add camera movement with the keyboard or the mouse, check one of the many examples to do that.
We'll be using a sphere geometry to create the mesh, because it's very convenient for our purposes. The material can be a wireframe shader for the time being, until we get into more sofisticated shading. Wireframe and bright colours are always a good combination for debugging 3D.
Here's the starting code:
<!doctype html>
<html lang="en">
	<head>
		<title>Perlin noise | Fireball explosion</title>
		<meta charset="utf-8">
	</head>

	<body>
		<div id="container"></div>
	</body>

	<script src="js/Three.js"></script>

	<script type="x-shader/x-vertex" id="vertexShader">
		// Put the Vertex Shader code here
	</script>

	<script type="x-shader/x-vertex" id="fragmentShader">
		// Put the Fragment Shader code here
	</script>

	<script type="text/javascript" id="mainCode">
		// Put the main code here
	</script>

</html>
Add this JavaScript code to the script tag we called mainCode.
var container,
	renderer,
	scene,
	camera,
	mesh,
	start = Date.now(),
	fov = 30;

window.addEventListener( 'load', function() {

	// grab the container from the DOM
	container = document.getElementById( "container" );

	// create a scene
	scene = new THREE.Scene();

	// create a camera the size of the browser window
	// and place it 100 units away, looking towards the center of the scene
	camera = new THREE.PerspectiveCamera(
		fov,
		window.innerWidth / window.innerHeight,
		1,
		10000 );
	camera.position.z = 100;
	camera.target = new THREE.Vector3( 0, 0, 0 );

	scene.add( camera );

	// create a wireframe material
	material = new THREE.MeshBasicMaterial( {
		color: 0xb7ff00,
		wireframe: true
	} );

	// create a sphere and assign the material
	mesh = new THREE.Mesh(
		new THREE.IcosahedronGeometry( 20, 4 ),
		material
	);
	scene.add( mesh );

	// create the renderer and attach it to the DOM
	renderer = new THREE.WebGLRenderer();
	renderer.setSize( window.innerWidth, window.innerHeight );

	container.appendChild( renderer.domElement );

	render();

} );

function render() {

	// let there be light
	renderer.render( scene, camera );
	requestAnimationFrame( render );

}
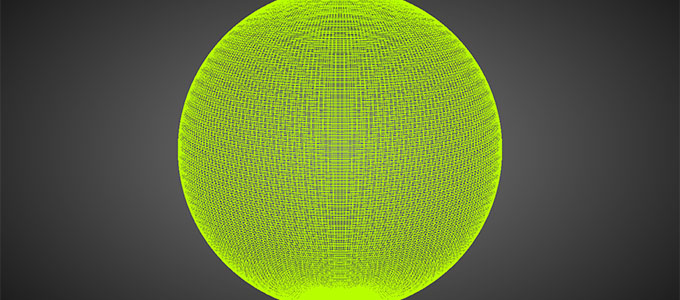
This sets up a scene, with a wireframe sphere of radius 20, made of 200x200 segments, in the center, and a camera looking at it, flat, from 100 units away. Try changing the radius or the segments in the sphere, or moving the camera or the mesh somewhere else.
See the first step. Nothing fancy yet, just getting a solid base.
Creating our custom shader
If we want to fiddle with the rendering, we have to create our own shader. A custom shader will allow us to code how we want a vertex or a fragment to behave. We'll need to change material from a standard THREE.MeshBasicMaterial to a THREE.ShaderMaterial. A ShaderMaterial has some basic parameters: vertexShader, fragmentShader and uniforms.
- vertexShader: the GLSL code for the vertex manipulation.
- fragmentShader: the GLSL code for the fragment manipulation.
- uniforms: a list of variables that are shared by both the vertex and the fragment shader.
Change the line in which material is created to this:
material = new THREE.ShaderMaterial( {
	vertexShader: document.getElementById( 'vertexShader' ).textContent,
	fragmentShader: document.getElementById( 'fragmentShader' ).textContent
} );
This code takes the content from the script tags and assigns it to the correct shader. This will be composed by three.js into a full shader, and passed to the WebGL driver to be compiled. Then it'll be ready to use.
Add this code to the script tag that we called vertexShader.
varying vec2 vUv;

void main() {

	vUv = uv;
	gl_Position = projectionMatrix * modelViewMatrix * vec4( position, 1.0 );

}
This shader is almost the most elemental vertex shader there is. It takes the attribute (a parameter for a vertex) UV (a two-dimensional vector, or vec2, that specifies from 0 to 1 which texel to read in a given texture) and passes it to the fragment shader using a uniform (a parameter that can be shared or passed between the vertex shader and the fragment shader) called vUV (another vec2). It also takes the vertex position attribute (position, a three-dimensional vector that specifies the original location of the point, in object coordinates) and performs the transform to place the vertex in eye coordinates. Both values are created by three.js when creating a mesh using a primitive like SphereGeometry or IcosahedronGeometry and passed without you having to worry about anything.
Add this code to the script tag that we called fragmentShader.
varying vec2 vUv;

void main() {

	// colour is RGBA: u, v, 0, 1
	gl_FragColor = vec4( vec3( vUv, 0. ), 1. );

}
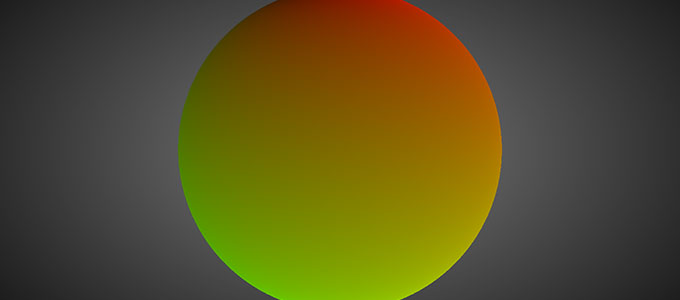
This shader is also very simple. For the given fragment, takes the UV coordinates (set to vUV by the vertex shader and interpolated by the GPU for each fragment) and uses them as the two first components of the fragment colour. We could be using a solid colour as output of the fragment shader, but colouring the object with the texture coordinates makes easier to see what's going on.
See the second step. We have a shader going!
Let's make some noise!
Now finally comes the fun part! Spheres are nice, perfect by definition and all that, but extremely boring; we have to disturb the vertex position to get interesting shapes: potato, blob, stars, explosions...
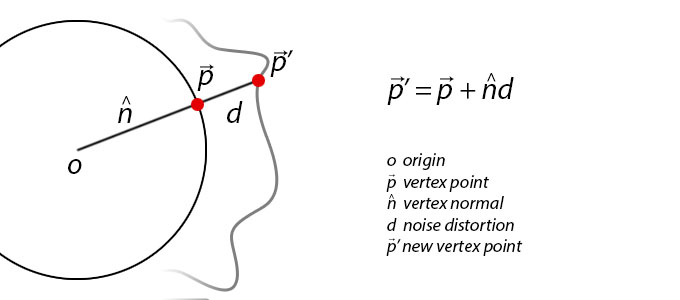
The main idea here is disturbing each vertex along the direction of its normal. Imagine that there are lines that go from the center of our sphere to each vertex, one line per vertex. Initally, all those lines are the same length (the radius of the sphere). If we make some longer, and some shorter, we have an interesting disturbed mesh.
Random is good, but also chaotic and not very appealing. We want the disturbance to be based on some random but controllable function, and here's where Perlin Noise comes once again to save the day.
I'll be using ashima's webgl-noise, a fantastic set of Procedural Noise Shader Routines compatible with WebGL. I'm not going to copy the whole code here, you'll have to add it in the vertex shader code, where the comment says so. We'll be using Classic Noise 3D. There are a lot of alternatives for having Perlin Noise in your shader: standard implementations, simplex implementations, a noise texture. Which one to choose depends on the usage and requirements for the noise. The rule here is that the more complex, the slower. If you need a lot of noise values, you might need a texture for quick lookups.
Let's disturb the vertex along the normal: we want to multiply the normal by some scalar factor so it scales (the line from the center to the vertex shrinks or grows, and since it's defining the vertex position, the vertex itself moves inwards or outwards). That's where we get a noise value. The coordinates for the noise are based on the normal before being modified, and the noise value is modulated to fit the desired scale. I'm not using the noise function directly, but using a turbulence function instead, courtesy of Ken Perlin, that creates really interesting shapes. You're encouraged to experiment with different noise functions, and feeding different parameters and periods to the noise functions.
I do an aditional distortion, adding a factor based on a larger noise (a low frequency noise), to disturb the sphere shape. Try changing the values for noise and b to see how each affect the generated shape.
This is very important when working with noise functions: you usually pass parameters with time coherence, since you don't want the mesh to change abruptly it's shape every frame. This is achieved by using some value that it's the same every frame for your vertex or fragment: it can be an attribute or a uniform, but I usually like to use the UV coordinates, the position or the normal. Usually before transforming to eye coordinates.
I'm storing the noise as a fake ambient occlusion factor, that will be useful when rendering the shape, to highlight raised regions agains sunken regions.
Now we calculate the new position of the vertex, by moving the vertex along its normal by the displacement factor: as easy as taking the original position and adding the normal multiplied by our noise.
The new vertex shader looks like this:
// Include the Ashima code here!

varying vec2 vUv;
varying float noise;

float turbulence( vec3 p ) {
	float w = 100.0;
	float t = -.5;
	for (float f = 1.0 ; f <= 10.0 ; f++ ){
		float power = pow( 2.0, f );
		t += abs( pnoise( vec3( power * p ), vec3( 10.0, 10.0, 10.0 ) ) / power );
	}
	return t;
}

void main() {

	vUv = uv;

	// get a turbulent 3d noise using the normal, normal to high freq
	noise = 10.0 *  -.10 * turbulence( .5 * normal );
	// get a 3d noise using the position, low frequency
	float b = 5.0 * pnoise( 0.05 * position, vec3( 100.0 ) );
	// compose both noises
	float displacement = - 10. * noise + b;

	// move the position along the normal and transform it
	vec3 newPosition = position + normal * displacement;
	gl_Position = projectionMatrix * modelViewMatrix * vec4( newPosition, 1.0 );

}
And this is the new fragment shader, using the ambient occlusion factor:
varying vec2 vUv;
varying float noise;

void main() {

	// compose the colour using the UV coordinate
	// and modulate it with the noise like ambient occlusion
	vec3 color = vec3( vUv * ( 1. - 2. * noise ), 0.0 );
	gl_FragColor = vec4( color.rgb, 1.0 );

}
See the third step. This is a deeply deeply disturbed sphere...
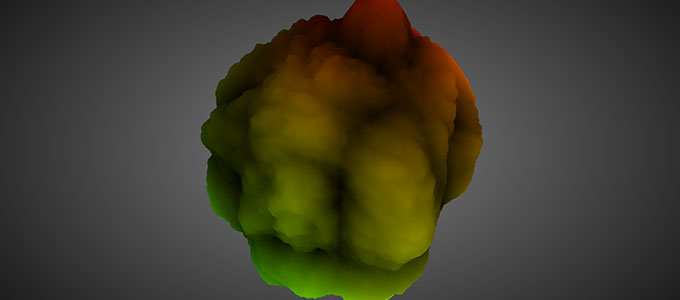
Add some colour, and movement!
We're almost there. It's starting to look like something recognizable.
Let's add some colour. We could code a function that uses several interpolators to create a gradient that goes from dark to bright, passing through red, orange and bright yellow. I usually don't like spending unnecessary time dealing with assets if there are alternatives. In this case, I went to google images, looked for explosion images, picked the one I liked the most and cut a slice of image that had the right gradient.
Now that we have an image, we have to pass it to our shaders so it can be used. That's done in JavaScript, and we have to modify the ShaderMaterial we created previously. We add a uniform that defines a texture (a 2D sampler). We're adding a time factor, too, to animate the explosion. It's not easy sometimes to remember all the conventions three.js uses for uniform types: this is a life saver Uniforms types.
material = new THREE.ShaderMaterial( {

	uniforms: {
		tExplosion: {
			type: "t",
			value: THREE.ImageUtils.loadTexture( 'explosion.png' )
		},
		time: { // float initialized to 0
			type: "f",
			value: 0.0
		}
	},
	vertexShader: document.getElementById( 'vertexShader' ).textContent,
	fragmentShader: document.getElementById( 'fragmentShader' ).textContent

} );
I've updated the code to use the new three.js notation to specify textures in uniforms.
And we add this first thing on our render method, so the time variable specified in the uniform is updated.
material.uniforms[ 'time' ].value = .00025 * ( Date.now() - start );The final vertex shader is almost the same, but we're adding a time factor to the noise lookup, so it moves with time.
// Include the Ashima code here!

varying vec2 vUv;
varying float noise;
uniform float time;

float turbulence( vec3 p ) {
	float w = 100.0;
	float t = -.5;
	for (float f = 1.0 ; f <= 10.0 ; f++ ){
		float power = pow( 2.0, f );
		t += abs( pnoise( vec3( power * p ), vec3( 10.0, 10.0, 10.0 ) ) / power );
	}
	return t;
}

void main() {

	vUv = uv;

	// add time to the noise parameters so it's animated
	noise = 10.0 *  -.10 * turbulence( .5 * normal + time );
	float b = 5.0 * pnoise( 0.05 * position + vec3( 2.0 * time ), vec3( 100.0 ) );
	float displacement = - noise + b;

	vec3 newPosition = position + normal * displacement;
	gl_Position = projectionMatrix * modelViewMatrix * vec4( newPosition, 1.0 );

}
And this is the final fragment shader, sampling a texture to determine the colour, based on the depth. It also includes a random function, to break the gradient a bit so it looks more natural.
varying vec2 vUv;
varying float noise;
uniform sampler2D tExplosion;

float random( vec3 scale, float seed ){
	return fract( sin( dot( gl_FragCoord.xyz + seed, scale ) ) * 43758.5453 + seed ) ;
}

void main() {

	// get a random offset
	float r = .01 * random( vec3( 12.9898, 78.233, 151.7182 ), 0.0 );
	// lookup vertically in the texture, using noise and offset
	// to get the right RGB colour
	vec2 tPos = vec2( 0, 1.0 - 1.3 * noise + r );
	vec4 color = texture2D( tExplosion, tPos );

	gl_FragColor = vec4( color.rgb, 1.0 );

}
See the fourth and last step. Booom!
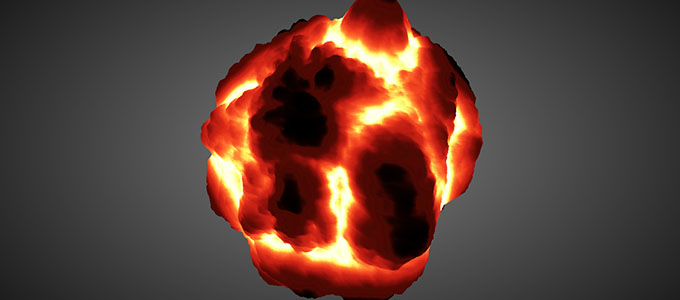
Wrapping up
This is basically all there is to start altering a mesh with polynomials. From here, the sky is the limit. The vertex displacement can be done by reading a 2D or 3D texture; it can be done along the normal or the tangent; it can be scaled, twisted, modulated, inverted...
Note that the normals are not correctly calculated for lighting: we're just disturbing along the normal from the original shape, the sphere. It's not updated to be the normal for the new shape we're creating. In this case it doesn't matter because the object is self-illuminated, or 100% emissive. For complex lighting, the correct normal has to be calculated.
If you are wondering about the many "random" values, don't think about them as magic, obscure numbers. It's all a matter of experimenting until getting the right look and feel. I can assure you that nobody gets those values right the first time, it's all after much tinkering and iterating. In fact, a lot of experiments turn out to be a completely different and unexpected thing. So don't despair. You might lose a fireball, but you might win a... slimy broccoli?.
You can see other examples of what can be done with this simple technique in the Experiments with Perlin Noise Series, or a bit more sofisticated example in It's a Halloween Message!.
As always, question and improvement suggestions are welcome. Have fun experimenting on your own!
-
Related links
-
Failed experiments
-
Further reading
-
External links